


MEDE-POINT: AN ASSISTIVE TOOL FOR SURGICAL INSTRUCTION
SUMMARY:
I was working on a semester-long project in medical product ideation with a team of graduate medical product engineering students as part of a graduate level course in the fall of 2021. In this course, I have gained experience with conducting extensive ethnographic endeavors such as customer discovery interviews, observational analysis in the OR, idea affinitization, stakeholder analysis, and the development of a customer image diagram. With the knowledge I gained from ethnography, I engaged in group brainstorming, sketched concepts, and iteratively developed low resolution prototypes of a headlamp-attachable assistive tool for surgical instruction in the OR.
DESIGN GROUP MEMBERS:
-
Zachary Roy
-
Mark Freithaler
-
Kat Zougari
-
Ryan Seger
-
Dr. Jennifer Steimen (clinical mentor)
SKILLS LEARNED:
-
Customer discovery interviews
-
Observational analysis in the OR
-
Idea affinitization
-
Stakeholder analysis
-
Customer image diagram development
-
Group brainstorming activities
-
Foamcore prototyping and modeling
CLASS INFORMATION:
-
Class: BIOENG 2150
-
Class Professor: Dr. Alan Hirschman, Dr. Joseph Samosky, Dr. Sarah Wagner
DEVICE DEVELOPMENT
Problem Statement and Clinical Need Statement
PROBLEM STATEMENT
When surgical instructors guide students during procedures, neither of the surgeon’s hands are available for pointing/directing with. There is no way to physically direct the students to small anatomical features without stopping their current task, such as retracting or holding tools. Stopping their current task is a behavior that may compromise the sterile field or disrupt the workflow of the surgical procedure.
CLINICAL NEED STATEMENT
A way for surgical instructors to effectively communicate where to make incisions, suture, cauterize, etc. on patients during a surgical procedure without the use of their hands and/or without compromising the sterile area or stopping the procedure to instruct, and in less time than it would take to direct verbally. Our clinical mentor had preference to involve her surgical headlamp into the incorperation of the design of the eventual solution.
The problem statement and clinical need statement were derived from the ethnographic research and analysis performed for the scope of this project as shown below.
Ethnographic Research
OBSERVATIONAL ANALYSIS
Information regarding the initial project background and type of device preferred was provided to us at the start of the course by Dr. Steimen.
To learn more about our specific unmet clinical need and to see our need was the right one to solve, I and the rest of my team took part in an observational analysis visit in an OR in the Surgical Oncology Department at Magee Women's Hospital observing Dr. Steimen perform an instructional surgery with a medical fellow.
While in the OR, we were taking notes on all of our observations like how much light was present, how often the surgical instructor moved around the patient, how headlamps were used etc.
All notes, along with images of the headlamp usage by the surgeons, and sketches of the OR layout were taken during our OR visit.

Both are utilizing their headlamps to illuminate the sterile field. The OR is very bright with the ceiling lights and the large skytrons overhead.
Both are utilizing their headlamps to illuminate the sterile field. The OR is very bright with the ceiling lights and the large skytrons overhead.

Individual observations from all group members from the OR visit were recorded.
Duplicate ideas were eliminated.

All the notes culminate in a Customer Image Diagram for our team to determine design criteria.
Individual observations from all group members from the OR visit were recorded.
IDEA AFFINITIZATION
Idea Affinitization is a way to organize and categorize the copious amount of observations taken during ethnographic efforts into a hierarchal structure in order to extract specific design criteria for the clinical unmet need. Notes and observations from all four team members were collected and compiled into "sticky notes" using MURAL. Repeated observations were eliminated. Several rounds of silent selection of important notes and observations was conducted by the team. The previously selected sticky notes were then organized by general topic and given descriptive headings. Headings were then organized by general topic again and given new high-level headings (shown in purple). The final headings served as the overall design criteria in our Customer Image Diagram
Image 6
All groupings were used to create a Customer Image Diagram for our problem statement with the headings as our design criteria moving forward. Our 5 design criteria for our eventual solution are as follows:
-
Sterile technique must be maintained at all times
-
The interaction of colored light will drive design
-
The sounds and physical contact of people and objects constrain tools
-
Ancillary headlamp components are modifiable but often require outside help
-
Headlamp design is fixed and must endure all movements from clinicians
For more detail on these criteria, see Image 6 for sub headings.
STAKEHOLDER INTERVIEWS AND STAKEHOLDER ANALYSIS
Additional interviews were conducted with medical fellows and physicians in the UPMC Oncology department. All have had experience being instructed in surgical settings and utilize headlamps during surgeries. All had experienced some similar issues of miscommunication when instructing or being instructed during a teaching surgery. For how to indicate features, the color green was mentioned frequently as there are seldom any green structures in the human body (which is primarily red) or in the sterile field (which is primarily blue). Use of the foot pedals are common as a way of controlling/activating our solution indicator as hands could not be used without compromising the sterile field. Also types of head movements could be used to activate our solution indicator.

This is a stakeholder analysis of key customer channels and what impact our solution would have on each of them
This is a stakeholder analysis of key customer channels and what impact our solution would have on each of them
A stakeholder analysis was also conducted to determine how our solution could impact our key stakeholders. We identified that the net impact of our solution on the end users, surgeons and fellows/medical students as communication and learning during surgery would be improved. However, the net impact on the hospital would remain neutral as surgeries would be more efficient, our solution would be an additional cost.
Solution Ideation and 'Pretotype' Development
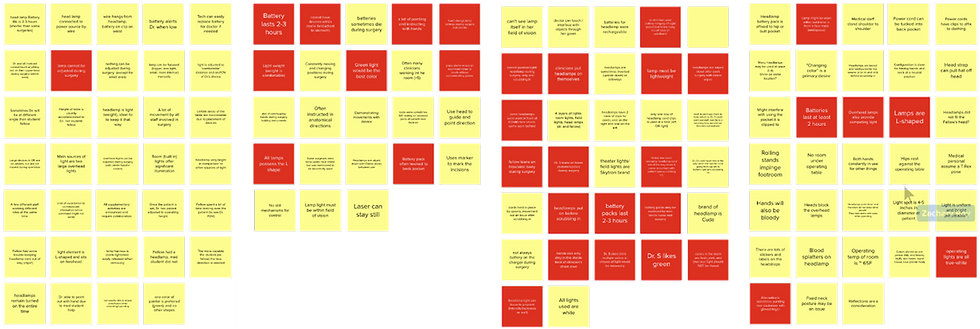
MORPHOLOGICAL ANALYSIS
Our solution ideation began with a morphological analysis. The columns in this morph chart indicate different features and design considerations based off of our results from prior interviews with Dr. Steiman
Such features include:
-
Functional considerations such as the indication method, and how to attach the device to the headlamp, and how to power it
-
Human factors considerations such as how to turn on the device and how to switch colors among others
The rows indicate different options or mechanisms that satisfy the design considerations.
Each sticky note was conceived from all team members during a silent brainstorming session. Any idea was included no matter how ridiculous. For example, we could create a device that is

This morph chart is used to help determine what features our potential solution could possess. Various solutions can be realized by picking different criteria.
This morph chart is used to help determine what features our potential solution could possess. Various solutions can be realized by picking different criteria.
controlled via a brain-computer interface, attached via staples, and lights the area of interest with glowworms.
With all options on the table, our group then established an easy to produce solution (shown with a green line), a very difficult solution (shown with an orange line), and a solution that would be preferred by our clinical mentor based on initial feedback. (shown with a pink line)
This preferred solution can use a foot pedal to control it and switch colors, an LED as an indicator light, attached to the headlamp via a clip-on, made of plastic, and powered by rechargeable batteries.
This morphological analysis was conducted in class prior to our scheduled observational analysis session in the OR. After our observational analysis visit in the OR, we learned a lot more about our specific unmet need and how it could be used in action leading to additional design considerations.
At the conclusion of our ethnographic efforts and morphological analysis, our group arrived at two potential solutions which we made pretotypes of.
PRETOTYPE SOLUTIONS
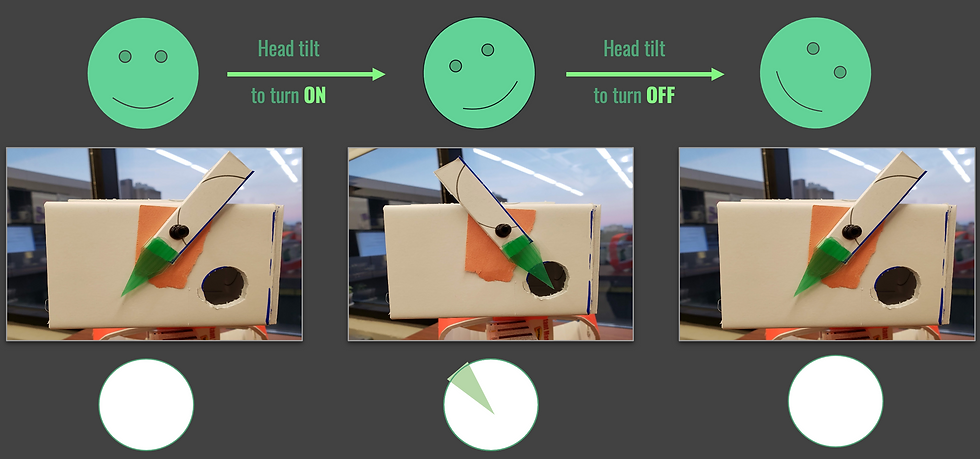
The pretotype solutions our team created are both indicator lights that are attached to the front of a surgical headlamp that can be turned on and off via a head tilt mechanism. This indicator light will show in the middle of the illuminated field produced by the headlamp. This indicator will allow the surgeon teaching to point to areas of interest with accuracy to help better communicate their instructions to the student/fellow operating alongside them.
Our group had removed consideration of an external stationary foot pedal due to how much the surgeon moved around the patient in the OR. Additionally, both concepts use a green indicator as green is a color that us unnatural to the human body in the OR. Each concept differs in its indicator light source.

Translucent Green Pointer Pretotype
Translucent Green Pointer Pretotype Functionality
Translucent Green Pointer Pretotype
The first pretotype used a concept we called subtractive light, with a green colored translucent pointer to indicate the areas of interest within the illuminated region.
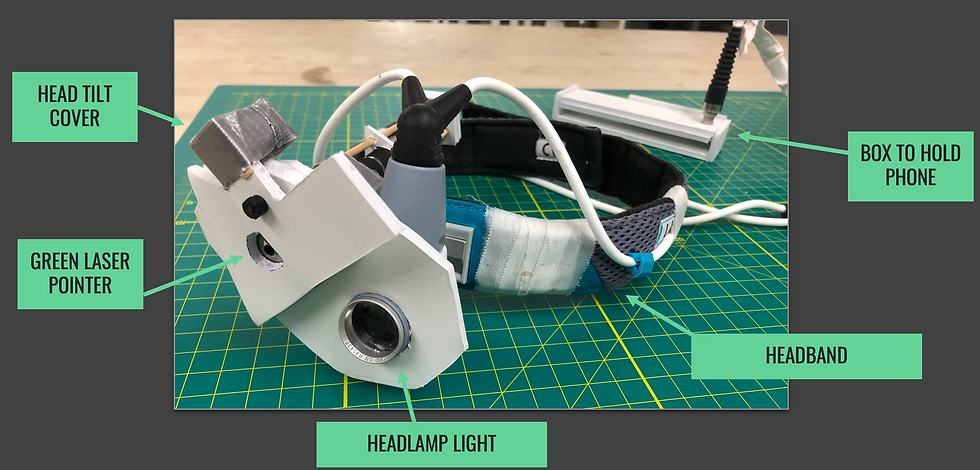
At the time of constructing this pretotype, our team did not have access to a surgical headlamp, so we constructed a mock surgical headlamp out of foamcore to test our idea.
The box at the anterior portion is used to house a smartphone, which when the phone’s flashlight is turned on, it acts as an analog to the headlamp light.
PRETOTYPE SOLUTION 1 -- TRANSLUCENT GREEN POINTER
The head tilt mechanism works via a pendulum with a translucent green pointer attached at one end and a small weight attached to the other end. The weight gives the pointer a greater moment of inertia so activation will only occur with intentional head tilts and not activate at any small head movement.
After the wearer tilts their head in one direction, the pendulum will swing and the translucent green pointer will land in front of the light, illuminating a green triangle on the illuminated field below. The tip of the triangle would be where the surgical instructor wants the student/fellow to look. Once the pointer is no longer needed, the surgical instructor would just tilt their head in the opposite direction.
We had presented this pretotype to Dr. Steiman via zoom to get her feedback on the design. She really liked the concept and gave us almost entirely positive feedback. While this was great to hear, we wanted to see if our translucent green pointer would work with the surgical headlamp lights.
To test this, we asked Dr. Steiman to run a quick killer experiment for us since she had access to a headlamp. We did not know if the existing headlamps have lenses that focus and do not diffuse the light (is this true?)
What we wanted to test was how sharp our green pointer would appear in the light field or how much the light would diffuse around the pointer.
If light does not diffuse, then the shadow cast by the translucent green triangle will be clear and crisp, making indication easy to interpret. This is what we want.
If light does diffuse, then the shadow cast by the translucent green triangle triangle will be hazy and not have defined edges, making indication difficult to interpret. We want to avoid this.
In the video (~8 second mark), Dr. Steiman is holding the pen very close to her headlamp light which is where we would have our translucent green triangle indicator. The pen’s form is almost impossible to see and distinct boundaries of the pen aren’t made clear until it brought farther away from the headlamp and toward the illuminated field (~16 second mark).
Because of the results of this test, our group killed the translucent green pointer concept and pivoted to our next pretotype solution.
PRETOTYPE SOLUTION 2 -- GREEN LASER POINTER
This pretotype solution uses a concept called additive light, with a green laser pointer shining a sharp bright dot in the center of the illuminated field.
Now with access to a surgical headlamp, our team created a pretotype attachment out of foamcore. Our pretotype is attached to the anterior portion of the headlamp light. The green laser pointer is located adjacent to the headlamp light.
To model the functionality, the green laser pointer is kept on for the duration of the wear but the laser is obstructed by activating of the head tilt mechanism, turning the device “off”.
Green Laser Pointer Pretotype

Green Laser Pointer Functionality
Green Laser Pointer Pretotype
The box in the background on the right is used to house a phone with the phone flashlight powering the headlamp via a fiber optic cable.

Green laser point and headlamp light shown in green circle.

Dr. Steiman using the laser pointer to point to specific letters as she reads them out loud to test the accuracy and precision of the indication with her head movements
Green laser point and headlamp light shown in green circle.
The head tilt mechanism works the same way here as in the previous pretotype. It is a pendulum with a weighted end at the top and a wider flag-shaped portion at the bottom to cover the laser pointer lens. When the indicator is activated, a bright green dot will appear in the center of the illuminated field.
We brought this pretotype to Dr. Steiman for feedback where she provided us with positive feedback on the use of the laser pointer indicator. The indicator point was able to be discerned with the headlamp shown in the footage as well as the headlamps used in Magee, which was not shown on camera.
We had asked her to try and read letters off of a flyer in the conference room by pointing to them as shown in the video.
Her two critiques of the device were if a smaller head tilt or a foot pedal could be implemented to control the on/off feature of the indicator. She also had some concerns if staring at a reflection of the laser point for long stretches of time would be safe.
FUTURE DESIGN MODIFICATIONS
Both of these critiques from Dr. Steiman along with feedback received from ethnographic interviews with fellows and doctors led us to the future design considerations for a higher resolution prototype if the project is continued further.
Almost all of our ethnographic interviews with our clinical mentor and outside doctors and fellows have suggested the use of a foot actuated mechanism. We therefore propose that our final prototype would have the option to a portable foot pedal mechanism, a less forceful head tilt mechanism, or a head turn mechanism.
With regards to laser pointer intensity, a laser pointer that is considered safe for use without eye protection would be utilized as it would be less hazardous to the user and those around them.
Additional Steps for Project
In addition to the ethnography and prototyping, our team also conducted and completed a:
-
Hazards and risks analysis
-
Market analysis
-
Competitor analysis
-
Preliminary patent search
-
Regulatory and reimbursement strategies